The Concept of Crypto Programming
In short, crypto programming is software development using blockchain technologies, as well as their combination with more familiar frameworks and languages like React and C++.
Cryptocurrencies and blockchain development is becoming more and more in demand. This is a job with huge salaries, an infinite number of vacancies and unlimited potential for the future. It is the big groundwork for the future that moves these technologies far ahead.
The point is that cryptocurrencies and blockchain will form the basis of the economy of the future, where decentralized financial systems will rule the ball. And the blockchain technology itself turned out to be universal enough to be useful not only in strictly financial matters (investments, auctions, commercial relations, etc.) but also in other spheres of human activity.
By choosing crypto programming, you will make programs like other developers, but under the hood of your projects, there always will be the code directly related to the most advanced technologies existing.
What Is a Cryptocurrency Developer?
A cryptocurrency developer is a person who is not just close to computers and knows how to create a page or a code but a developer who is well acquainted with the technologies of decentralized finance. At best – having experience working with the backend component of programs, and at worst – at least understanding how to write program code in principle.
Such a developer is engaged in creating backend code for decentralized applications, which are called Dapps. They usually exist on the Ethereum network (Ethereum) and are nothing more than smart contracts.
What Is “Ethereum”?
Ethereum is a whole blockchain environment that allows everyone to run programs in a trusted environment supported by smart contracts.
Unlike Bitcoin, the Ethereum platform allows you to interact not only with cryptocurrencies but with other data too.
The corresponding programs are run in an environment called EVM (Ethereum Virtual Machine). It allows you to convert code written by people into a set of characters that is digestible for the blockchain and supports smart contracts created to perform certain tasks inside the blockchain. It also uses its own currency, called Ether.

This is the largest system of its kind and at the same time the most popular one. In most cases, employers are looking for crypto programmers to create software that will be implemented in the Ethereum project interface.
Smart Contracts
This is code that runs in an EVM environment and is capable of processing data transmitted to it, Ether or any logic. For smart contracts, functions are written that allow manipulating the information transmitted to them. You can share data with other smart contracts or, based on the information received, broadcast between smart contract users.
A smart contract allows you to exclude a third party from any transaction. The program code will be responsible for justice: open, incorruptible and working correctly.
Crypto programmers are engaged in smart contacts creation, allowing the inhabitants of the blockchain network to make transactions related to Ether.
What Languages and Libraries Are Used in Crypto Programming?
To create smart contracts and other components of the cryptocurrency network, both traditional general-purpose languages and new ones created specifically for working with Ethereum or its analogues are used.
The four most popular ones include:
- Solidity. It is a leader in the field. The first language worth learning is to start creating DApps and smart contracts. The language is based on JavaScript and C++ syntax. It has strict typing and a fairly low entry threshold for beginners. We’ll talk about the Solidity Ethereum development language later in this article.
- Java. A powerful platform that has proven itself in dozens of areas of development, including the creation of software for mobile operating systems. It is in demand in the blockchain environment due to strict adherence to the principles of OOP and the abundance of libraries required when working with cryptocurrencies.
- Vyper. A safe and functional programming language with syntax borrowed from Python. It is focused on working with EVM and creating smart contracts.
- Python. Python itself couldn’t get past this top either. One of the most universal and ubiquitous languages has also found its place in the blockchain real world.
How to Start a Career in Crypto Programming?
The threshold for entering the profession is impossible. Due to the high demand, the requirements are not particularly strict, but mere enthusiasm is not enough. It is necessary to acquire basic knowledge and delve into the study of blockchain programming languages.
What Do I Need to Learn, and What Do I Need to Know?
To begin with, it is worth reading about the blockchain in general. We need to understand how the whole system works in general terms. Familiarity with the technical features of the implementation is optional, at least in the early stages.
After that, you need to decide on the language. For beginners, Solidity is recommended, as it is easier to understand. The next stage should be either an in-depth study of the documentation with constant independent practice or a visit to the appropriate courses.
In terms of equipment, you don’t need anything. It is enough to open a web IDE called Remix and write your first smart contract according to the instructions on the official Solidity website.
Which Environment in Remix IDE Can Be Used to Connect a Private Test Network?
You can access the Remix IDE in various ways: via the Internet, via a web browser such as Chrome, from a local copy, or from Mist (the Ethereum Dapp browser).
Using the In-Browser Remix IDE
You can access the Remix IDE from your web browser without any special installation. Visit https://remix.ethereum.org, and you will be presented with a complete IDE with a code editor and various panels for compiling, running and debugging your smart contracts. You will have an example contract with a default newsletter that you can play with.
Remix IDE
After Solidity, you will have to learn the frameworks used: Truffle to simplify the creation of smart contracts, Ganache to test software in a virtual blockchain network, Web3.js for connecting the backend component of your brainchild with the front part (it can be React or Vue).
On the online courses, you will be educated in all aspects at once. Many active Solidity developers got into the profession straight after the courses. The average training time takes less than six months.
Perspectives and Future
Crypto programming is a new stage of the developer’s profession, which is constantly gaining popularity. If you are interested in promising and monetary work, you should pay attention to blockchain development.
A Practical Guide to Ethereum Development. Solidity Smart Contract Programming.
If you are creating an Ethereum-based DApp or an ERC20 token, you need to learn the Solidity language. Although blockchains are language-independent and many of the existing languages are used by blockchain engineers, there are some tasks that cannot be conveniently implemented by existing ones. It has opened up demand for new, crypto-specific options. One of these languages is Solidity.
Regardless of whether you are an experienced developer or just starting out in cryptography, it would be a good idea to start studying Solidity because smart contracts have become an important part of the blockchain ecosystem. In addition to the active implementation of dApps, they are actively integrated into infrastructure-level blockchains and even into bitcoins through providers such as RSK. Knowing how to create smart contracts, you can track the way blockchain programmers work and will be able to have better solutions.
Solidity Documentation
Smart Contracts Basics
As part of development, the smart contract consists of three sections: balance, storage and codes. The balance represents how much Ethereum a smart contract has. The storage contains data such as strings and arrays that are specific to each and every application. The code section contains raw machine code that is compiled from what we write in Solidity.
Unlike user accounts, smart contract accounts are not external to the respective networks. In other words, you can use your wallet on various networks like Kovan and Ropsten, but you can’t do it with a smart contract. Smart contracts are internal.
Each smart contract has a source that is stored on the author’s device and instances that are stored in the blockchain. To create an instance (account) of a smart contract, we need to deploy it on the network. It is very similar to the relationship between classes and instances in traditional object-oriented programming (OOP) and the languages representing it (JS, Ruby). To give you a more visual representation, let’s create a Bike class and add an instance of it.
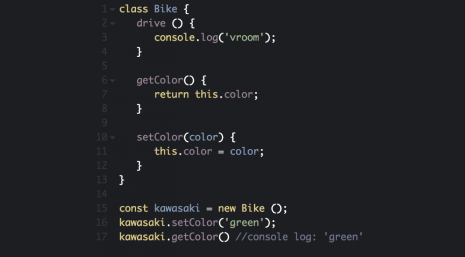
Bike class & instance
We will write a contract definition, which will then be run through a compiler that will create two files: a bytecode and a binary application interface (ABI). The bytecode is what will actually be passed to the EVM, and the ABI is the layer between the bytecode and the regular JavaScript code that allows you to create a user interface (UI).
Choosing an IDE and Solidity Version
Before we get started, we need a proper Integrated Development Environment (IDE). In other words, we need a convenient terminal with the necessary tools to write our code. For the purposes of this guide, we will choose Remix, an IDE created by the Ethereum Foundation that allows you to write, test, debug, run smart contracts and much more. You can use it either directly in the browser or download it locally if you want.
After running the Remix, you will see a code editor in the center, a file manager on the left, and a compiler on the right.
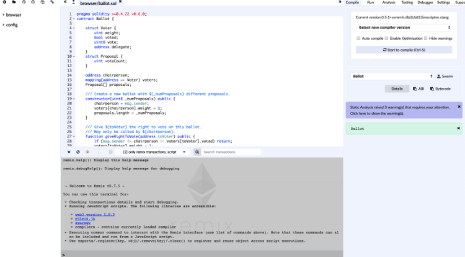
Initial Remix window
There will be some pre-written code — we won’t need it. To create the first unique smart contract, let’s click on the plus icon in the upper left corner of the terminal and give it a name.
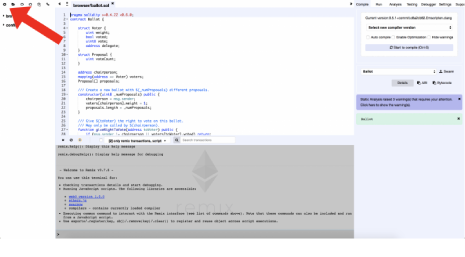
Creating a new project in Remix
Because we have an empty document. sol, we have to specify the Solidity version that the compiler will run. At the time of writing this guide, the latest version was 0.5.7. If you are not sure which version to use, you can specify a range of versions.
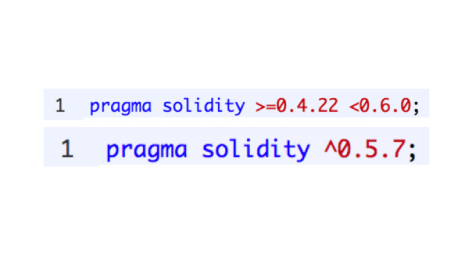
2 types of specifying the Solidity version
Let’s give our smart contract a name, followed by parentheses.
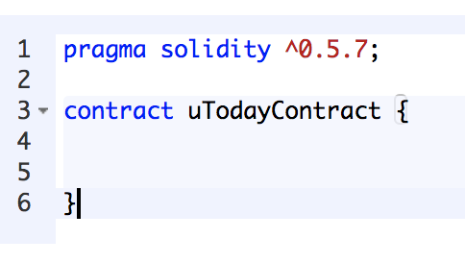
Naming the contract
Writing Your First Smart Contract
Once we have the canvas ready, it’s time to define the main building blocks — variables. Although experienced software developers will have no problems understanding this concept, we will briefly introduce it to beginners. Variables are placeholders for portions of information that are subsequently referenced by the program that runs them.
Let’s create a pair of variables: a string (a sequence of characters) and an integer (a number). In the case of Ethereum, variables are stored in the blockchain along with the rest of the contracts and, therefore, can be accessed and updated from anywhere. Another key characteristic of Solidity variables is that you can make them private by writing “private” next to the variables. Finally, for integers, Solidity has two types: signed (can be positive and negative) and unsigned (can only be positive). To specify an unsigned variable, we should just put ‘u’ in front of it.
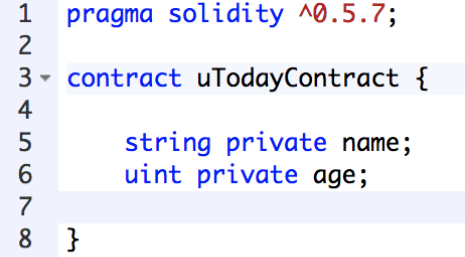
A private string and an integer
When we have a name variable, we need to write the methods of setting and receiving. This is similar to the JS function. Remember that Solidity has static typing, so we have to define the types of variables. Now any value we put in ‘setName’ will define the string ‘name’. To get it, we will use getName and specify which variable we expect to see. Now it’s time to do the same for the age variable. The method is constructed similarly to getName.
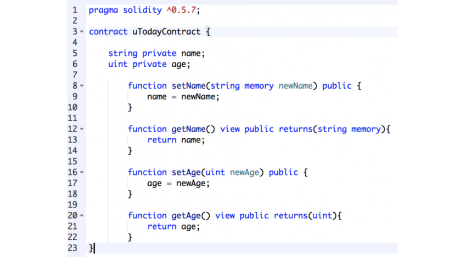
Name/age setters and getters
Let’s check out our little piece of code. Go to the “Run” tab of the compiler and click “Deploy” under the name of your contract. At the very bottom of the compiler, you will see the section “Deployed Contracts”, where our methods are available. To pass the name to the value “Newname”, we need to make sure that our string is written in JSON. Otherwise, “getName” will not return anything. For “setAge”, just specify your age without quotes. As you can see, we can now set and receive the name and age variables through our smart contract.
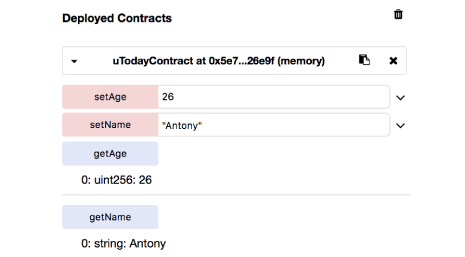
Compiler, name and age
What Are Wei and Gas?
One of the most remarkable features of smart contracts is that in order to deploy them on the Ethereum network, you will need to initiate a transaction that costs a certain amount of money, which is paid in Ether. It is extremely important to understand how fees are used in the system, as they will be deducted every time you interact with EVM.
What Is Wei?
Let’s assume that while reading our lesson, you have used Bitcoin at least once. You probably made a small transaction that cost less than 1 BTC. In this case, you used Satoshi, something like cents on the dollar. Wei is similar to Satoshi — it is the smallest part of 1 Ether. If we think about it from a programming perspective, this is the lowest unsigned integer on the network. Interacting with the network, you most often encounter Gwei, which belongs to Gigawee and is equal to 1 billion Wei.
What Is Gas?
Gas is an integral part of the smart contract execution mechanism. It has two values for each transaction: the Gas consumed and its price. It is worth noting that the user initiating the transaction determines these values himself. However, if the set Gas value is not enough to perform a certain operation, then Gas will be consumed, but the transaction will not be executed. Moreover, if the gas price is set too low for the network at a given time, the transaction will not be processed by the nodes, which will ultimately make it unsuccessful. There are several services to check the optimal values for your transactions, one of which is ethgasstation.info. To better understand Gas and why it costs some money, let’s start coding some of them ourselves.
Go back to the Remix window and create a new file. In our example, we will call it “Gas” and create a contract with the same name. Keep in mind that the more data we need to store on the blockchain, the more Gas we will need. At the same time, for the purposes of this lesson, we will create a cheap contract; The more you add to it, the higher the fee will be.
There is a function that returns an integer that is the sum of two inputs. To make it as easy as possible, we will indicate that our contract will not store anything in the blockchain, and for this, we will add “pure” next to the function.
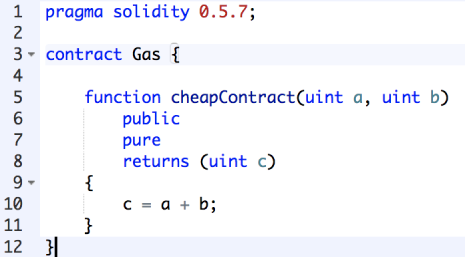
Cheap contract
Now you can expand it in the compiler and enter any two numbers to get the integer “c”. To check the price of our transaction, we have to look at the terminal located under the code section. There is a transaction cost and an execution cost. The first refers to how much data the transaction has. The second refers to how much EVM energy was required for the transaction.
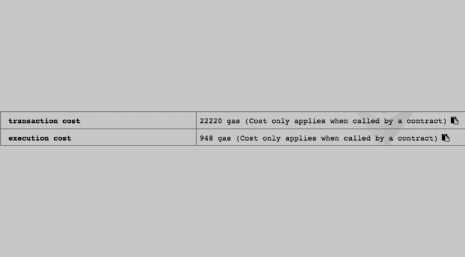
This is a very simple transaction that costs almost nothing to the network. When writing meaningful smart contracts, you will add more details, which will increase their weight and, consequently, transaction fees.
Creating and Deploying Your Own ERC20 Token. Token Issuance and ICO Creation.
Let’s face it, most blockchain developers who are just starting out tend to play big and create their own blockchains and tokens. Although this is an extremely complex topic that has attracted some of the best software developers from other fields, creating a basic ERC20 token is not a difficult task.
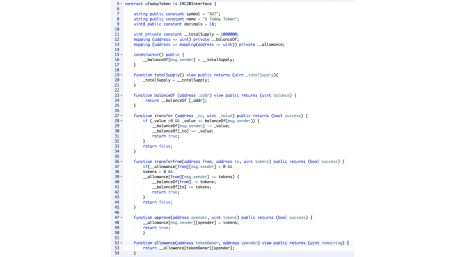
First, we need to create another file in Remix and load the ERC20 interface, namely:
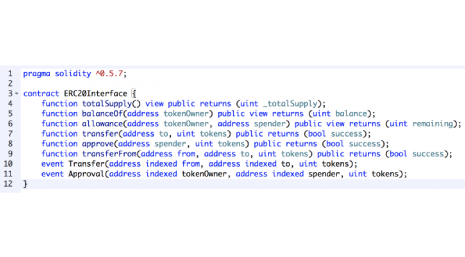
ERC20 Standard
The totalSupply function allows us to see how many tokens we have in total. The balanceOf function is used to get the number of tokens at certain addresses. The transfer function allows users to perform transactions among themselves. The “transferFrom”, “allow”, and “Approve” functions allow users to allow other users to initiate transactions on their behalf. Events are registration tools for the general ledger.
In addition to the interface itself, we will need a separate file. sol for our new token. Here we import the ERC20 interface and specify the symbol, name and decimal numbers of our token.
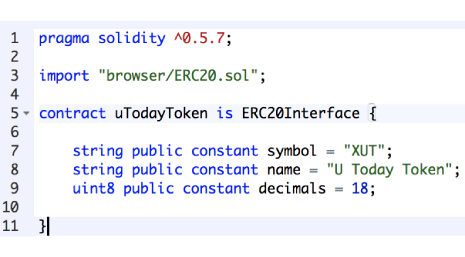
uToday token
Before we compile it, we need to specify the constraints
- Let’s start with a general sentence — this is a constant integer variable, which we will make private. The total stock of our tokens will be 1 million. We will also write a function to return this value.
- Secondly, we need to store our tokens somewhere. To do this, we will need to specify a mapping that will return the balance for any specified address.
- Thirdly, there should be a function for transferring tokens, which will essentially have the recipient’s address and the number of tokens transferred. This function should also be able to check whether the sender has enough tokens on his balance, which can be implemented using a simple if/then statement. In addition, we will set conditions for ‘_value’ so that users cannot send transactions with “0” tokens, as this will lead to clogging of the network with various garbage.
- Fourth, we need to create a mapping for the rest of the functions, which is an integer mapping.
- Then we will specify several checks in the “approve” and “allow” functions and set the conditions for ‘transferFrom’.
- Finally, not all tokens will be available on the market. Some of the tokens are usually reserved for teams, foundations, consultants and other purposes. Therefore, it is important that we make it clear how many tokens will be circulating in the system. When we create the tokens, the negotiable offer equals our balance.
uToday token constraints
The code is ready, so let’s check it out. Go to the “Run” tab of the compiler and expand our token contract. You will see that we have the token data, as well as the general offer, balances and surcharges. Congratulations, you have created your first token.
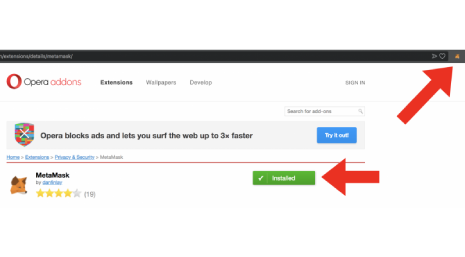
In order for our token to really work on the network, we need to deploy a smart contract (note that this is different from deploying it for testing in Remix). For this tutorial, we will use Remix and Metamask, but there are other ways to do this. Metamask is a simple but effective Ethereum wallet program with a nice user interface that integrates as an extension into some of the most popular browsers. In our case, we will use Opera. First, go to metamask.io and download the extension. Once this is done, you will see the fox icon in the upper right corner of your browser.
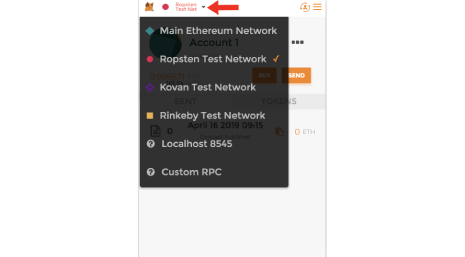
Click on the icon and follow the suggested instructions to create a wallet. Don’t forget to save the secret phrase! When you have a wallet, click on the Metamask icon and change the network to “Ropsten” because we don’t want to mess with the main Ethereum network.
The last step is to create some Ether (unfortunately, you won’t be able to use it for any real purchases, but they are necessary for testing). Go to faucet.metamask.io and request 1 ether.
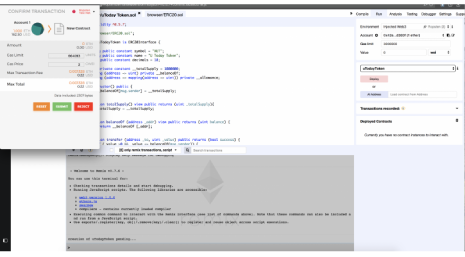
Now you have everything ready. Go back to the Remix window and change the environment to “Injected Web3” in the compiler. Also, take a look at the account tab — your address must match the address you created in Metamask. Select the smart contract you want to deploy, which is your token contract, but not the ERC20 interface, and click the appropriate button. A Metamask window will appear with the transaction, its details and options for interacting with it. Send a transaction, and our token will come to life.
Now you can play around with all the features we mentioned earlier. Let’s look at our contract from the other side to make sure it works correctly. Like any other blockchain, Ethereum has several block explorers that serve the main purpose of monitoring what is happening on the network. In our case, we will use etherscan, although there are several other great alternatives. Note that if you just log into etherscan, you will see the Main Network. Since we need to see the Ropsten network, you will need to put “ropsten” before the site address. Find your address, and you will see two transactions — one for the free Ether that you received and the other for the deployment of the contract.
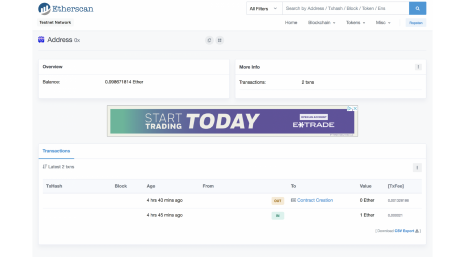
To find the address of your contract, click on TxHash and go to the “To” field. Here you can check transactions, code and events of your smart contract. At the moment we need to check and publish our contract. Go to the “Code” section and click the “Verify and Publish” ‘Verify and Publish’ link. Here you will need to specify the name of your token again, the compiler version (in our case, the last version of Solidity we used was 0.5.7, so we will stick to the corresponding compiler version). Now you need to copy the token smart contract code along with the ERC20 interface code from the Remix window to etherscan and click “Confirm and Publish” ‘Verify and Publish’ at the bottom of the screen.
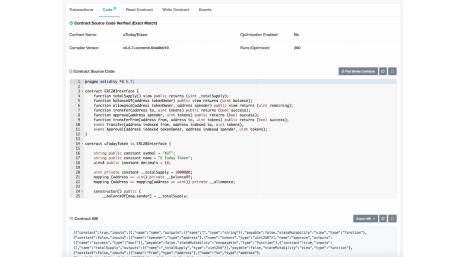
Smart contract verification
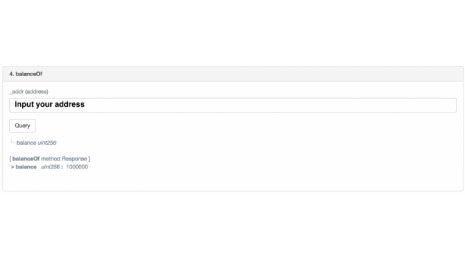
It’s time to go back to the address of your contract. The code on the “Code” tab will now be subject to verification. In addition, now you will have two more tabs: “Read contract” and “Write contract” ‘Read contract’ & ‘Write contract’. In the reading section, we can check the functionality of our token. Enter your address (not the contract address) in the ‘balanceOf’ field to see how many tokens you have; it should show 1 million, which we hard-coded as a total stock and transferred to our wallet. This means that our token now works correctly in the test network.
If you want to start a developer’s career in the crypto industry, you should understand that, despite its relative simplicity at the core, the blockchain has incredible flexibility and functionality. Since 2017, blockchains have evolved significantly, and their use cases have gone beyond just financial transactions. With the advent of Ethereum, a whole new layer of networks has appeared, which hosts various dApps applications and blockchain-based solutions. The tool of this evolution was a smart contract, and if you want to expand your experience, make it more valuable and future-oriented, you need to know how it works.
If you can encode smart contracts using other languages, Solidity is still better suited for these purposes. Moreover, if you want to become an Ethereum developer or create ICO/ERC20 tokens for your project, this is definitely your choice. If you have some experience with C++ or JavaScript, coding in Solidity should be relatively easy for you. However, you will have to understand some of the differences between client-server and decentralized software startup models. Thanks to the Ethereum Foundation and some third-party organizations, developers are provided with a set of convenient tools, such as Remix and Etherscan, for coding and deploying smart contracts.
We hope that our tutorial has helped you to understand most of the concepts of Solidity in order to start an exciting journey of learning blockchain technology. Remember that you can always check with the latest Solidity documentation.
If you’d rather skip the learning curve and have production-ready contracts built for you, ICODA’s smart contract development company handles everything from Solidity coding to security audits and mainnet deployment.